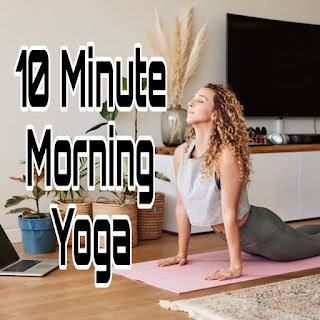
10 Minute Morning Yoga
Level: Intermediate
Total Time: 30-60 seconds
Indications: digestion, infertility
Contraindications: blood pressure (high or low), insomnia, headaches
The Revolved Side Angle focuses on building strength in your knees and ankles
while stretching your shoulders, chest, lungs, spine and groin. It can energize
your abdominal organs and improve your digestion, stamina and balance. Many
people believe that the revolved side angle can aid in recovering from
constipation, backache, osteoporosis, and infertility. Those who have ever
experienced blood pressure problems, insomnia, or who have a headache should
avoid this pose. If you are prone to neck problems, look ahead or down at the
ground instead of looking up.
Begin by standing in mountain pose. Stand tall and straight with your feet
separated enough to feel stable. Establish a solid connection with the
ground by shifting your weight distribution so that it is equally divided
between the base of your big toes, the base of your little toes, and both left
and right sides of your heels. Breathe deeply.
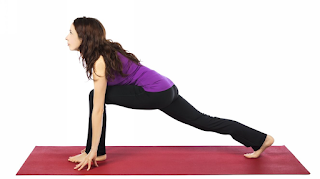
Breathe out, placing your hands on your hips, and stepping back with
your left leg into a lunge. Position your right foot at a 45-degree angle to
the right and point your left foot slightly to the right. Align your heels,
tense your thighs and rotate your right thigh slightly outward. The middle
of your kneecap should be directly over your right ankle, not tilted in or
out.
Breathe out and rotate your torso to the right until you are looking over
your right leg. As you do this, raise your left heel and rotate on the ball of
your foot until the inside of your foot is parallel to the inside of your right
foot. Inhale slowly.
Breathe out and bend your right knee until your thigh is parallel to the
ground. Your right shin should be vertical at this point, with your knee
directly above your heel. At the same time, press your left thigh toward
the sky and stretch deeply through your left heel while tucking in your
tailbone.
Breathe out again, twist your torso further to the right and lower your left
shoulder toward your right leg. Lower your left arm to the right of your
leg, using the pressure of your arm against your thigh to help twist your
shoulders further. Pull your shoulder blades down and back. The
objective is to lower your left arm all the way to where it meets the
shoulder, but listen to your body. You may feel discomfort, but you
should never feel pain.
Continue to stretch your torso for several breaths.
To release yourself from this pose, breathe in, raise your torso up as you
exhale.
Return to mountain pose. Stand tall and straight with your feet separated
enough to feel stable. Establish a solid connection with the ground by
shifting your weight distribution so that it is equally divided between the
base of your big toes, the base of your little toes, and both left and right
sides of your heels.
After resting in mountain pose for a few slow, full breaths, repeat the
process, this time bending over your left leg.
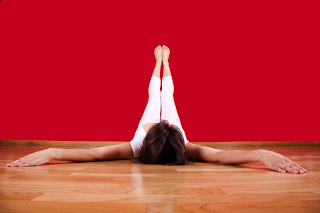
Legs Up The Wall
Level: Beginner
Total Time: Up to 15 minutes
Indications: digestion, blood pressure, respiration
Contraindications: eye injury, back or neck problems
The legs up the wall pose focuses on stretching the backs of your legs and neck
as well as the front of your body. It can treat cramped legs and feet while
relieving minor backaches. Experts credit this pose with relieving a number of
conditions including arthritis, blood pressure problems, sleeplessness, menstrual related
symptoms, headaches, and digestive/respiratory issues. There are
contradictory beliefs regarding whether women experiencing menstruation
should perform this pose. Consult with an experienced instructor if you have
questions. Individuals with eye, back, or neck problems should avoid this pose
entirely.
To perform the legs up the wall position, you will need a support like a thick
folded blanket. You will also need a wall you can prop your legs up to.
The first thing you’ll need to do is figure out where and how to place your
support. It is intended to raise your back off the ground beneath your
waist. If you are very stiff, you may need less support, but place it further
away from the wall. The more flexible your hips, legs, and back, the
taller a support you can tolerate and the closer you can approach the wall.
You will want to experiment until you figure out what is most
comfortable for you.
A good starting point is to place your support half a foot away from the
wall. Sit alongside the edge of your support with the right side of your
body touching the wall. Breathe out and roll on your hips until your
shoulder meets the ground. Roll on your back to the right, lifting your
legs up onto the wall. Your head and shoulders will rest lightly on the
ground and the arch in your back will be supported firmly. If your body
moves off the support, you can modify its position to prevent this.
Your hips will lie in the space between the support and the wall. Raise
your head and let it sink straight down, making your neck a straight
extension from your back. Inhale and allow your chest to rise and your
ribs to expand. Let your shoulder blades separate to either direction away
from your spine and let your arms and hands rest on the ground straight
out from your sides.
Slightly tense your legs to help keep them in place along the wall. Let the
tops of your thighs relax. Turn your gaze toward your heart.
Remain in this position for five minutes, breathing deeply and steadily.
Over time you will be able to work your way up to a full 15 minutes in
this pose.
To release, move your body off the support by rolling onto your right
side, lowering your legs to the ground. Remain on your side for a breath
before inhaling as you sit back up. Use your arms to push your torso into
a sitting position, with your left leg along the wall.
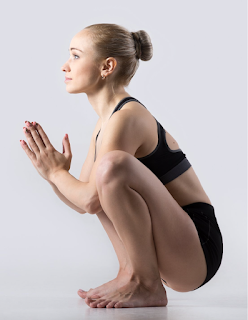
The Garland
Level: Beginner
Total Time: 30 to 60 seconds
Indications: digestion, metabolism
Contraindications: injury to low back, ankle, knee or hip
The garland pose helps stretch your groin, ankles and your back while toning
your stomach. Beginners may find it helpful to sit on the edge of a chair instead
of squatting. Your thighs and your upper body should create a 90-degree angle
and the soles of your feet should be slightly forward of your knees.
Begin by squatting with your feet together and your heels on the ground.
Separate your thighs until they’re beyond the width of your shoulders.
Breathe out, lean your torso forward until it is between your thighs.
Push your elbows outward against the insides of your knees and bring
your hands together in the salutation seal. Press your knees into your
elbows to help elongate the front of your body. Press your inner thighs
against your sides. Stretch your arms forward, move them to your sides
and bend the fronts of your lower legs into your armpits. Push the tips of
your fingers into the ground.
Stay in this position for 30 to 60 seconds. Breathe in and release yourself
by straightening your knees and standing into a standing forward bend
pose.
10 Minute Morning Yoga
The Revolved Triangle
Level: Intermediate
Total Time: 30 to 60 seconds
Indications: digestion, respiration, balance
Contraindications: back injury, migraines, low blood pressure, sleeplessness,
diarrhea
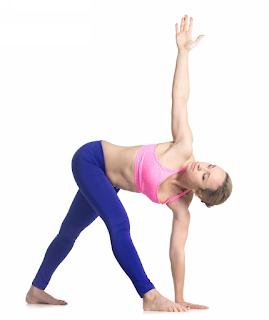
The revolved triangle focuses on stretching and building strength throughout
your legs. At the same time, it opens your spine and hips. It can improve and
energize your breathing by opening up your chest and stimulating your
abdominal organs. Experts believe the revolved triangle can help with
constipation and sciatica, it can improve your digestion, help with back pain, and
enhance your balance.
Beginners may find it helpful to approach this pose with a narrow stance and to
use the help of a wall to secure their back heel in place. If you have ever had a
spine or back injury you should avoid the revolved triangle. Individuals with
migraines, low blood pressure, sleeplessness, headaches or diarrhea should also
avoid this pose.
Begin by standing in mountain pose. Stand tall and straight, this time
with your feet about three feet apart. Establish a solid connection with the
ground by shifting your weight distribution so that it is equally divided
between the base of your big toes, the base of your little toes, and both left
and right sides of your heels. Breathe deeply.
Raise your arms parallel to the ground with your palms facing down.
Stretch both arms out from your sides; this will widen your shoulder
blades.
Keeping your legs straight, pivot to the right on the balls of your feet; then
plant your heels on the ground. To stabilize your balance, lift your toes
and point your left foot slightly to the left. Lift the toes of your right foot
and point your right foot slightly to the right.
Breathe out again, twisting your body even more to the right and bring
your torso down over your front leg. Place your left hand on the ground
on either side of your foot. Let your left hip lean down toward the
ground. If your right hip rises up toward your shoulder when you do this,
press the outside of your right thigh to the left; this should shift your hip
away from your shoulder. If needed, you can push your right thumb into
your hip to help your body move correctly.
Newcomers to this pose should keep the head steady and look ahead or
down to the ground. More experienced individuals can turn their heads to
gaze at their thumb.
Press your arms away from your body using force through the middle of
your back. Bear your body weight on your heels and on your front hand.
Stay in this position for 30 to 60 seconds. Breathe out, release your body
from the twist, breathe in and move your body up.
Repeat this process, this time pivoting to your left

Post a Comment
Post a Comment