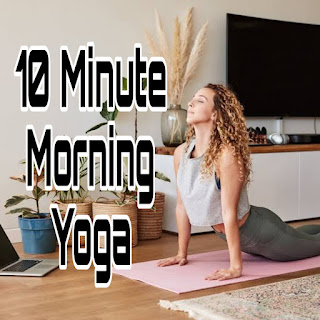
10 Minute Morning Yoga
Focus: Knees, Ankles, spine Level: Beginner Total Time: Variable
Indications: calm the mind
Contraindications: knee or hip injury
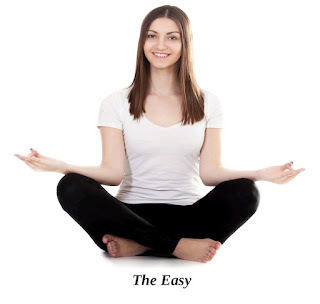
The Easy The easy pose focuses on your lower legs, specifically your knees and ankles, while simultaneously strengthening your back. It has also been found to calm the brain. Beginners may find it helpful to use the aid of a yoga block for this pose by sitting near a wall and placing the block in the space between your shoulder blades and the wall. You’ll also need a thick sheet or blanket for this pose.
Fold a blanket into a mode of support that is a few inches thick. Sit down cross-legged and place the blanket under your hips.
Place your hands, palms downward, atop your thighs as you turn both thighs slightly inward and press them down into the ground. Sustain this for two full breaths.
Continue to sustain this as you place your thumbs under the edge of your armpits and let the upward force lift your entire torso until your head is straight above your heart, which is itself directly above your hips.
Place the tops of your calves over one another, expand your knees, place each foot behind its opposite knee, and gather your legs toward your body.
Rest the edges of your feet on the ground and make sure your inner arches are against your lower shins. Your shins and thighs should create a triangular shape with a space between your feet and your abdomen. Ensure that your abdomen is in a relaxed position. Rest your hands on your knees and elongate your tailbone toward the ground. Tense your shoulder blades, pulling them toward your spine without arching your back.
Stay in this position for as long as you’d like. If you plan on regularly performing this pose I recommend alternating the way you cross your shins (i.e. Right over left then left over right next time)
The Extended Triangle
Focus: Lower Legs
Level: Intermediate
Total Time: 30 to 60 seconds
Indications: digestion, backache (especially if pregnant)
Contraindications: diarrhea, headache, low blood pressure
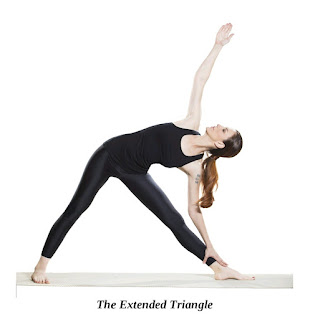
The Extended Triangle helps you stretch and build strength in your ankles, knees and thighs while energizing your abdominal organs. It can also stretch your shoulders, spine, chest, hamstrings, hips, calves and groin. The extended triangle can help enhance your body’s digestion and can aid in the relief of a backache, especially for pregnant women. Beginners may find it helpful to perform this pose against a wall for balance support.
You can use the extended triangle as preparation for twisting poses or forward bends. If you suffer from diarrhea, headaches or low blood pressure you should avoid this pose. If you have balance concerns, don’t hesitate to keep a wall behind you for support. If you suffer from high blood pressure, make sure that you gaze down at the ground in the final position. If you experience neck problems, keep your gaze straight ahead instead of looking up.
Begin by standing in mountain pose. Stand tall and straight with your feet separated enough to feel stable. Establish a solid connection with the ground by shifting your weight distribution so that it is equally divided between the base of your big toes, the base of your little toes, and both left and right sides of your heels. Breathe deeply and fully, in, and then even more slowly out.
Breathe in again. Breathe out and separate your feet until they are three feet apart. Stretch your arms out to your sides, keeping your shoulder blades broad, your chest high, and your palms facing the ground.
Turn your left foot slightly to the right. Rotate your right leg out from your hip until your foot is at a 90-degree angle to your torso. Make sure the soles of your feet are firmly connected to the ground on the left and right sides of your toes and your heels.
Your right kneecap should be in line with the middle of your right ankle. Breathe out and stretch your body over your right leg while taking care to bend at your hips and not your waist. As you do this, simultaneously press your left heel into the ground. Pivot your torso slightly to the right, keeping its length evenly distributed. Allow your left hip to move forward slightly and allow your tailbone to elongate toward your left heel.
Place your right hand on your lower leg, ankle, or the ground, depending on your comfort level and ability to keep the sides of your body even. Reach your left arm straight into the sky and align it with the tops of your shoulders. You can let your head remain in place or you can turn it to the left and gaze toward your left hand.
Stay in this position for 30 to 60 seconds.
To release yourself from this pose, breathe in, and raise your torso,returning to mountain pose: Stand tall and straight with your feet separated enough to feel stable. Establish a solid connection with the ground by shifting your weight distribution so that it is equally divided between the base of your big toes, the base of your little toes, and both left and right sides of your heels.
Repeat the process, this time leaning to the left.
10 Minute Morning Yoga
The Lord of The Dance
Focus: Ankles
Level: Advanced
Total Time: 10-30 seconds
Indications: Balance, shoulders, chest, groin, abdomen
Contraindications: injury to ankle, arm, elbow, knee, low back
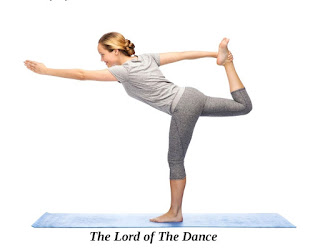
The Lord of The Dance The lord of the dance focuses on building strength in your ankles and legs while simultaneously stretching your chest, shoulders, abdomen, thighs and groin. It can help improve your balance. Beginners to this pose may find it difficult to balance themselves; don’t hesitate to seek out the aid of a wall for extra support. Often, a light touch on a stable surface can trick your body into thinking it has another solid point of contact, enabling you to sustain your balance more easily.
Begin by standing in mountain pose. Stand tall and straight with your feet separated enough to feel stable. Establish a solid connection with the ground by shifting your weight distribution so that it is equally divided between the base of your big toes, the base of your little toes, and both left and right sides of your heels.
Breathe in, balance yourself on your right foot and lift your left foot off the ground by bending your knee and raising your foot toward your rear. Press the top of your right thigh back into your hip joint and raise your kneecap.
While keeping your body upright, reach behind your body and grab hold of your outer foot with your left hand. At the same time, raise your pubis toward your abdomen and lower your tailbone toward the ground to avoid shortening your back.
Start raising your left foot up and away from your body. Stretch your left thigh away from you until it’s parallel to the ground. At the same time, extend your right arm in front of you, also parallel to the ground.
Stay in this position for up to 30 seconds, breathing deeply and steadily.
To release yourself from this pose, let go of your foot, bring it back to the ground.
Return to mountain pose. Stand tall and straight with your feet separated enough to feel stable. Establish a solid connection with the ground by shifting your weight distribution so that it is equally divided between the base of your big toes, the base of your little toes, and both left and right sides of your heels.
Repeat the process on your right foot.
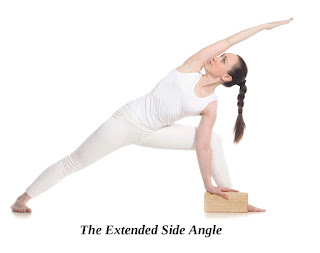
The Extended Side Angle
Focus: Ankles and Knees
Level: Intermediate
Total Time: 60 seconds
Indications: menstrual pains and infertility (women), constipation, sciatica
Contraindications: blood pressure (high or low), insomnia, headache, modification for neck injury
The Extended Side Angle The extended side angle focuses on building strength and stretching your legs but can also bring therapeutic benefits to your back. For women, this pose can relieve menstrual pains and infertility. It can open your chest, abdomen, shoulders and lungs. Beginners may find it helpful to perform this pose with the extended foot up against a wall to prevent sliding. If you suffer from blood pressure problems, insomnia or headaches you should avoid the extended side angle. If you suffer from neck problems or neck injury you should avoid turning your head upwards; instead, look straight ahead or down at the ground.
Begin in mountain pose. Stand tall and straight, this time with your feet separated by about three feet. Establish a solid connection with the ground by shifting your weight distribution so that it is equally divided between the base of your big toes, the base of your little toes, and both left and right sides of your heels.
Raise your arms out to your sides with your palms facing down; reach straight out through the tips of your fingers, keeping your shoulders broad and low.
Turn your left foot slightly to the right and turn your right foot out 90 degrees, even as you rotate your right leg outward until the top or your knee is straight out toward your right toes. Roll your left hip a little bit to the right, but keep your torso straight ahead.
Press your left heel into the ground by raising your inner left groin into your abdomen. Breathe out and bend your right knee over your right ankle. Let your knee extend toward your toes but never beyond them.
Keep your chest open and your shoulders back. Reach your left arm toward the sky with your palm facing to the right. Tuck your hips slightly under you.
Elongate the entire left side of your body to stretch from your left heel all the way up to your fingertips. Keeping your left heel on the ground, breathe out as you stretch to the right, reaching with the tips of your left fingers. Let your right arm relax straight downward, lowering in front of your right leg.
Let your left side continue to stretch to the right, lowering your torso toward your right thigh. Keep your hips tucked under and the tops of your shoulders vertical. Resist the tendency to turn your left shoulder forward by pressing the back of your right arm against your thigh. Stretch as far as your body will take you without turning. If your right hand can reach the floor, press your fingertips down, just beside your right instep.
Continue to stretch out your left side for several breaths. Then, breathe in, push up with your right hand on your thigh as you straighten your right leg and raise your torso back up, letting your arms lower to your sides
Return to mountain pose. Stand tall and straight with your feet separated enough to feel stable. Establish a solid connection with the ground by shifting your weight distribution so that it is equally divided between the base of your big toes, the base of your little toes, and both left and right sides of your heels.
Repeat this entire process, this time stretching to your left side.
Must read of 10minuteyoga
Tags-
20 minute yoga routine printable,
10 minute morning yoga kassandra,
10 minute morning yoga adriene,
morning yoga for beginners,
10 minute yoga stretch,
yoga stretches for beginners,
beginner yoga videos youtube free,
free printable yoga for beginners

Post a Comment
Post a Comment